 skins
skins
skins
skins
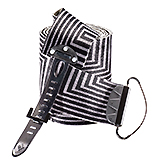
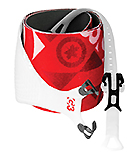
Skins are the randonnée skier's primary ascension tools. They are adhesive-backed pieces of fabric with tiny "hairs" pointing rearward; when affixed to the bottom of your skis and held in place by both their own glue and mechanical means, they allow skis to slide forward freely without slipping backward on hills.
A skilled ski tourist using skins can ascend terrain in excess of 45 degrees, given the right snow conditions. Using techniques like uphill kick turns and careful route-finding, skis equipped with climbing skins will get you up the vast majority of hills you intend to ski down.
Skins are available in synthetic (nylon), mohair (from the hair of Angora goats) and a combination of the two materials called "Mix." Generally nylon is more durable and gives better grip in wet snow, while mohair is known to give better glide and is preferred by racers. A mixed skin combining both - usually 60/40 or 70/30 mohair to nylon) is often the best choice for general ski touring. Skin material also comes in various weights, with the thicker fabrics generally weighing more and taking up more pack space but also giving longer wear. The depth and angle of the plush (fibers on the fuzzy side of the skin) affects grip and glide, with longer fibers having the edge in grip and shorter being superior for glide.
Attachment hardware varies - Black Diamond offers an adjustable cable or wire loop with stretchy synthetic strap for most of its models. G3's Alpinist+ and Minimist series use a similar stretchy tail with two carbon clips at the tip which adjust to different tip widths and shapes easily. Other top brands, like Pomoca, Colltex, Contour and Kohla use similar hardware of their own design. Race skins commonly use an elastic loop with shock cord stretcher for the tip and no tail fixing hardware, but keep in mind that when a "tail-less" system's glue fails it's often catastrophic. Rando racers and others who habitually use shortened skins with no tail hardware normally carry a spare set of skins with them.

Factory skin glue varies from manufacturer to manufacturer, and occasionally from batch to batch. Be skeptical of claims that "X" brand of skins is "crap" because the glue is no good - almost every manufacturer has had a bad batch of glue at one point in their history, but glue formulas has gotten much more consistent in recent years. The ideal is for the glue to never fail when you're skinning up, but release reliably when you want to rip (take off) your skins or separate them after removing them from your pack. In reality there is always a day when the glue isn't quite sticky enough, or you need two people to pull your skins apart in the field, but in general keeping your skins relatively clean and storing them dry and in a cool spot when you aren't using them should provide years of service.
Skins can either be straight (uniform width from tip to tail) or, more commonly, trimmed by the user to fit the exact contour of the skis. Skins that are trimmed to fit "wall-to-wall" (leaving only the ski edge and a sliver of base showing) give a decided advantage when skinning on steep or hard surfaces as there is no slippery edge to lose grip, but offer slightly inferior "glide" to a straight skin. If you find a super deal on skins that don't fully cover the base area of your intended skis, don't worry too much as long as you can get full coverage from right in front of the toepiece to about a foot in back of your heel - virtually all the grip comes from this small patch of ski under most conditions. Some models require trimming the skin to the proper length before cutting to match the ski sidecut, while others come in a series of pre-cut lengths.
Buying and Trimming Skins: New skins generally come straight, with their stated dimension (ie. 125mm) being the width for their entire length. You (or someone else) will need to trim them to match the sidecut of your skis. When you buy skins, you are looking for a width that will cover at a minimum the P-Tex base at the waist of the ski (normally 6mm or so less than the stated waist width) and at most the P-Tex width at the widest part of the ski (normally the tip, or near it). Skins get more expensive as they get wider, and you can usually save some money without losing any functionality by going 10mm or more narrower than your tip width. Example: For wall-to-wall coverage with dimensions of 131-115-121, buy skins with a nominal width of either 120mm or 125mm. Both will cover the center area of the ski back to the tail easily, the 120 leaving a 2.5mm gap on either side at the very tip which won't impact uphill traction significantly. Trimming skins is not as difficult as it seems. (Be sure to watch the company's "how to" video and follow the directions). Black Diamond and G3 include their own cutter with each pair of skins, and both give good results - in the absence of a factory trim tool, a straight edge razor blade also works well. With the BD cutter, move the skin side-to-side twice like they say (don't cut corners) and bend the letter-opener cutter laterally so you can put downward pressure on the skin as you cut. With the G3 cutter, which automatically puts an edge-width margin on each cut, you don't have to move the skin between cuts, but it helps to run your free hand ahead of the cutter to keep the skin from flopping as the cut progresses. With either cutter, if you get a ragged or uneven edge, you can clean it up later using an X-acto knife and metal ruler.
Here's a link to Black Diamond's video tutorial on skin cutting, and here is one from G3. Watch the one that applies (other skin manufacturers also have "how to" videos) and go to it.
Note: If you choose a twin tip or heavily tail-rockered ski to tour on, you'll have to figure out how to attach the skin at the tail so it stays centered and doesn't fall off. This usually means grinding a notch into the tail (be careful, this can void your ski warranty) or using a strap attachment like G3's twin tip tail hardware.
In marginal temperature conditions, or when skinning up through the freezing point, snow sticking to the bottom of your skins can be a problem. You probably won't slide backward, but each ski may take on several pounds of snow weight and they certainly won't slide forward efficiently. Several companies make bar or spray wax solutions to help prevent this, but they are most effectively applied when the skins are dry (ie. before you leave the house) - rubbing some of the same wax you use on your skis on the plush side of the skins before you set out is also effective. Racers and serious ski tourists take the time to hot wax and brush their skins much in the manner of waxing the base of the ski, which limits snow clumping and enhances glide.
Removing Skins in the Field: Most experienced randonnée skiers eventually work out a way to remove their skins at the top of a climb without taking their skis off. Usually this requires a bit of flexibility in order to grab either the tip or tail fixing hardware on your skin and forcefully yank (rip) it off. This saves minutes on your transition (nice in a freezing wind) and can give an extra measure of security in steep areas, since you never have to remove your bindings. It takes a bit of practice with either type of hardware, and it's best to practice this move on the flat first. Almost no one, including elite racers, leaves their skis on to apply skins - it's too hard to center the skin accurately and tension it correctly.
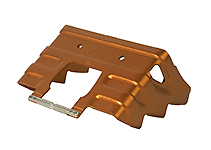
Ski crampons (or Harscheisen, in German), are aluminum contraptions with sharp serrations on the underside, meant to be used in conjunction with skins and offering much improved grip in certain icy, crusty and steep conditions. They attach under the boot either to a portion of the binding or to the ski itself.
A Note on Skin Maintenance: It's not necessary to use the plastic mesh "Cheat Sheets" that come with many types of skins while you are skiing. They fly away in the wind, and take time to apply. Just fold the skins glue-to-glue and put them in your pack or coat. Keep the glue as clean as possible by keeping them away from animal hair and vegetable matter - pick debris off the glue with tweezers or pliers when you notice it sticking to the bottoms. Heat can destroy skin glue; don't leave them on the dash of your car or in a hot attic in the summer but keep them in a cool place (some people use the cheat sheets during the summer, some people put the skins in a plastic bag then the freezer, I don't do either) for long-term storage.

© 2022 Gregory C. Louie